Tutorial Introduction
I switched from Windows to Mac OS X Tiger on a MacBook Pro about two years ago in early 2006, and have been enjoying the experience immensely; even more so with Leopard. I purchased Entourage with Office 2004 for Mac and had been using it with my corporate Exchange server at my company eSolia, but had grown weary of the monolithic local message store, so in December 2007, I decided to give Mail.app, iCal and Address Book a go on Leopard. Looking back, it's funny that I was so diehard Windows-only.
This tutorial describes how I set up Mail.app in OS X Leopard to handle both private and work email, using Google Mail accessed via the IMAP protocol, and sending mail via my ISP's SMTP server to avoid the Outlook "sent on behalf of" problem.
I'll make these naming conventions for this tutorial:
- Your "private" email is your Google Mail account
- Your "corporate" email is your account on a domain you or your company owns
Prerequisites
Here's what you need to prep before you begin:
- Google Mail Account information
- Information for a forward-able "Corporate" Mail Account
- ISP login and SMTP information
Let's get started.
Setup Forwarding for your Corporate Email
Setup your corporate email address to forward to your Google Mail address. In my case, I did this in Active Directory on my Exchange server, so that anything that comes in to my corporate address gets forwarded to Google Mail and does not get saved on Exchange. Other systems have other methods, like the use of hidden .forward files in the ~ home folder on a *nix server, and this is going to be slightly different for each person. The thing to watch out for is whether forwarding will take place server-side, or, you have to be logged in with your mail agent started for the forwarding to happen. Using Outlook's client-side rules is an example of the latter.
Setup an Account in Mail.app for Gmail
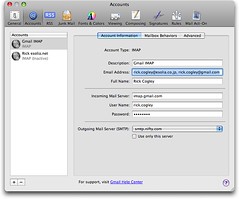
Setup an Account in Mail.app. You do this in Mail.app Preferences, Accounts, clicking the + sign as per usual in (usually) nice, consistent Apple applications. When the wizard starts, you'll have a choice to go for an automatic setup, but don't select that option. Go for the manual setup.
There are plenty of sites, Google's included, that explain how to set up Mail.app for basic IMAP access, so I won't bore you too much. In the Account Information tab, you can have both your corporate and private addresses. Note I have rick dot cogley @ esolia ... followed by a comma, followed by my private Gmail address, in "Email Address." The incoming mail server should be imap.gmail.com, and the username is your Gmail account without the @gmail.com.
Avoid the Outlook "On Behalf Of" Problem - Use your ISP's SMTP
For the outgoing SMTP server, I used my ISP @Nifty's provided one. Drop down the server list, and choose Edit server list. Then add your SMTP server's information. @Nifty requires us to log in (smtp-auth) to use their SMTP servers, and they require port 587 (as opposed to the more generic port 25). Set this up as specified by your provider. You might use your company's SMTP server as well if it is convenient and accessible from both inside your company network and outside.
Why not use Google's smtp.gmail.com? After all, if you do, everything you send out via it gets put into your sent items, which is convenient. The reason is an esoteric one, which has to do with the way Outlook or Exchange treat mail headers. If you send via smtp.gmail.com to an Outlook / Exchange user, they will see "From rick@gmail on behalf of rick@corporate" which is not very professional, is it.
Setup Advanced Settings
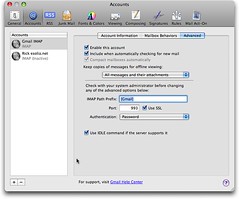
In the Advanced tab, enable the account, include it in checks for mail, decide how much of a mail and its attachments you want to keep for offline viewing. Set the IMAP path prefix to "[Gmail]" (without the quotes, of course) if you want a cleaner look for your folders in the main Mail.app interface. However, a warning: changing this means that Mail.app will RESYNC your entire mail store with Gmail. If you have a lot of mail stored in Gmail already, this could take a serious amount of time. I have about 1.5 GB, and it took days to sync.
Setup Mailbox Behaviors
Next use the Account's Mailbox Behavior's tab to set up what Gmail folder goes where, and what sync's with what. Here's how I set up mine, with Drafts, Junk and Trash stored in the server, Notes stored in the Inbox, and Sent mail NOT stored on the server. Later we'll make settings that will get your sent mail into the Gmail sent mail folder automatically, so never fear.
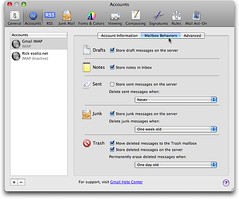
You can also make these settings by choosing the target folder in your mail folder hierarchy, and assigning the folder using the menu Mailbox, Use This Mailbox For.
Setup Junk Mail Processing
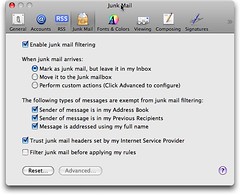
Gmail has excellent anti-Virus and Junk mail processing already, so I chose to leave any junk mail that got through in my main mailbox. This works well because Mail.app and Gmail get "confused" when there are multiple Junk mail locations. In Junk settings, I chose to trust the ISP's junk mail headers, and to not mark as Junk if the sender is in my Address Book.
Setup Google Mail Processing
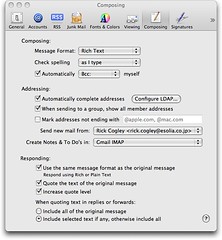
Now you have to do a few things to make your mail go into the correct folders. First, BCC yourself on all messages in Mail.app. This is in Preferences, Composing.
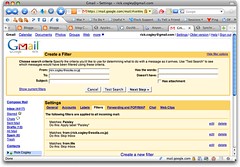
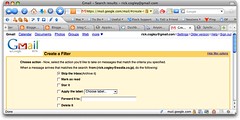
Next in the Gmail interface, set up a Filter to bypass the Inbox for anything that comes from yourself (while viewing the Inbox, click Create a Filter next to the Search the Web button). I created one filter each for both my corporate and private addresses. The filter should be set to match all mails From your address(es), and the Next Step should be to bypass the Inbox and send it straight to the Archive.
Google's IMAP implementation is different from the true standard. It seems they keep everything in one big folder per person and tag the mail so that it appears to be in certain folders in the web interface. Now, any mail that you send out of Mail.app is BCC'ed yourself, so that mail To: someone From: yourself will also be forwarded to your "private" Gmail address, and acted upon by the Gmail filters you create. The filter will fire, notice that the mail is from yourself, and automatically tag it correctly as sent mail so that it is visible in the correct place. Despite the fact that you are not storing Sent mail on the server, your local Sent Mail folder will still have a copy of the mail when it is sent from Mail.app.
Not to forget, additionally, you have to set up Gmail to use your "corporate" address. Do this in Gmail settings, Accounts tab. I added my corporate address, and verified as directed by Google.
So the Flow Goes
Someone sends mail to you@your.corporate.com, which is forwarded to your private@Gmail account. If it is a virus or spam, Gmail's filters for those will act upon the mail. If it passes through the gauntlet, Mail.app downloads the mail, runs another Spam check and processes any rules you have set, then copies the mail into your Inbox folder. You reply to the mail and Mail.app copies your reply into your local Sent Items folder. Because you have BCC'ed yourself, the reply gets routed to you@your.corporate.com again, forwarded to Gmail, and Gmail's filters act upon it, noticing it is From: you. The mail is automagically copied into the Gmail Sent Mail folder (tagged as Sent).
When you create an email, you choose which email you wish to send from, both of which you entered in Preferences, Accounts, "Email Address", separated by a comma. Your outgoing SMTP server would be your ISP's one or your corporate one depending on your setup. Your BCC address is automatically entered in based on your auto BCC setting. You click send, and Mail.app logs into your outgoing SMTP server to process the send, and the mail is processed into the right IMAP folder as appropriate.
Decision Summary
During this setup, we made the following decisions:
- Use the IMAP protocol not POP, because IMAP allows you to access your mail from multiple IMAP clients.
- Use your ISP's SMTP server to resolve the Outlook "on behalf of" problem, and use a Gmail Filter to make sure your mails get put in the Sent Items folder. The Gmail filter will skip the Inbox, and archive the mail from yourself immediately.
- BCC yourself to make sure the aforementioned filter always fires, putting sent mail in its place.
- Setup and verify your "corporate" account in Gmail, Settings, Account, so that you can choose From: me@corporate when you compose a mail in Mail.app.
It's a little bit complex, but it is nice to have a robust backend with great anti-virus and anti-spam measures, plus a large amount of storage space, for free. Kudos to Google for giving us such a wonderful service.
6 comments:
It's also possible to use Mail.app to connect to your Exchange account without forwarding all of your work email through Gmail. When you make a new account in Mail it lets you choose one of three server types: POP, IMAP, and Exchange. Using the Exchange option will let you access the Public Folders on the server.
Hi Chris - thanks for stopping by. Indeed, that's true, and it is more possible with the current version of Mail.app. When I tried it back when I wrote this, it was not working well, so I gave up and went this admittedly convoluted route.
Any idea how Exchange has to be set up?
Cheers,
Rick
I believe it requires the URL for your Exchange server's Outlook Web Access (webmail). Other than that, the setup is fairly similar to creating another IMAP account in Mail.app. Just after you create the account it will take a while to scan everything on the server, but after that it runs much faster.
I no longer have an Exchange account at my organization, but when I did the Exchange setup worked well (after the initial setup).
Best,
Chris
Many thanks Rick for this very helpful guide - I'm almost there with Gmail IMAP thanks to you! The remaining sticking point is dealing with the 'sent on behalf of' issue. Email to my work account gets forwarded from there to my Gmail account, so it all shows up in Gmail as being 'from' that work address. As a result the filter set up to recognise the emails I have BCCd there also picks up all my other mail. How do you get round this?
I could use Gmail fetcher to pull the email in from that account via POP, but this introduces a delay. It's not a big deal if I have to do this, but I'd prefer to avoid it if possible. All suggestions gratefully received!
many thanks
harry
Hi Harry - thanks for reading and I am glad to have been of some help.
It sounds like the mail headers are getting modified when being forwarded. Perhaps look into that, as there are several ways you can forward, each with its subtle differences in handling / rewriting.
Regards,
Rick
Thanks for the speedy reply. I rather doubt I have any control over that, but I'll look into it!
cheers
harry
Post a Comment