 I love this shot by Georgios Karamanis. Incredible color! Flickr is such an incredible resource for finding great photos.
Saturday, October 25, 2008
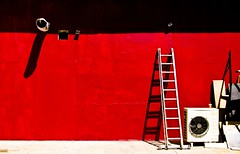
Ladder by Georgios Karamanis
Wednesday, October 22, 2008
Double-Duty Lumiquest SoftScreen & IR Filter
I am beginning to read through the outstanding and extensive off-camera lighting tutorials on David Hobby's "Strobist" blog, so that I can take better photos with my Nikon D90. The way I understand it, Strobist is a philosophy of DIY, using found or inexpensive materials over bespoke, and no-brand over brand.
Lighting is a complex subject, and it takes a while to study up on the terminology and terms. For a while, you swim (drown?) in TTL, CLS and Guide Number soup, until it starts to make sense. There are many decisions to be made, including whether to go Strobist (i.e., manual), automated Nikon CLS (Creative Lighting System) or some combination, whether to trigger your strobes optically or via wire or via transmitter, and so on.
I have a Nikon SB-900 speedlight. It is Nikon's latest, a big mother of a flash, and I want to use it off the camera so that I don't fry the eyes of my subjects (only half joking). You can use the built-in flash of the D90 DSLR as a "commander" for the SB-900 and other modern Nikon flashes (SB-800, SB-600, SB-R200). The SB-900 can also act as the commander in either the fully-automated Nikon CLS scenario, or, in a more Strobist-like SU-4 optical-master / optical-slave scenario.
One problem I read about is that when the built-in flash is acting as the commander, of say an SB-900, it will emit pre-flashes to check exposure and so on, and these sometimes can have a negative effect on your exposure meter-wise, or by causing your model to close his or her eyes, or in the case of critters, spooking them away. So, your alternatives in trying to take care of this problem are:
- Get a Nikon SU-800, which is a dedicated commander module with no flash capability. It is sold separately and as part of a macro photography kit.
- Get the 12 dollar bracket-and-screen set from Nikon called the SG-31R, which blocks the pre-flashes. This is just a bracket you slot into your hotshoe, and a connected black screen that hangs in front of your on-board flash.
- Wire up your SB-900 speedlight using a SC-28 or SC-29 cord and use it as the commander tethered to the camera.
- Put a bit of 35 mm film over your built-in flash since it is supposed to allow IR to pass through but block light. Kodak 120 Ektachrome processed unexposed should do the trick.
- Use "flash value lock" to get an exposure monitor pre-flash first, before taking the shot. Less chance of squinting or blinking.


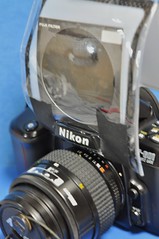
 Or you can do some creative, space-saving DIY, and use an inexpensive IR gel filter to block visible light while allowing IR to pass. I recently bought a Lumiquest SoftScreen, which is a compact diffuser sheet designed to make your on-board flash's light softer. It hooks into your hotshoe, and then you hook the other end of the screen onto the housing for the on-board flash.
The on-board flash's light will shine through the SoftScreen's white screen and get diffused. This seems to give better results than the somewhat harsh light from a direct hit from the built-in. When I heard about the purpose of the Nikon SG-31R screen, though, it occurred to me that I could somehow jury-rig the SoftScreen to hold an IR filter using its case, doing double-duty and saving me from having to carry around yet another contraption.


 In the end, I bought a 900 yen (about 8 dollars) Fuji Film #92 IR Gel Filter (actually, it filters the light and lets the IR through), at Yodobashi Camera in Shinjuku, Tokyo, on the 3rd floor of the Camera Kan near the large-format equipment. It even has a little paper holder so you don't mess it up with your grimy mitts (perfect for me, what with all that bike grease on my hands!).
The Steps to Pre-Flash Squelch Nirvana
Here's the steps I took to rig up the SoftScreen with the FujiFilm IR Filter:
- Buy a Fuji Film IR Filter at Yodobashi camera in Shinjuku, Tokyo. It was on the 3rd floor, with the large format film cameras.
- Open the filter, and install it in the little paper holder (two cardboard squares with a circle die-cut out). Secure the edge of the filter with a little Gaffer tape.
- Make a cut with an Xacto knife in the bottom of Lumiquest SoftScreen's plastic case (the side furthest away from the flap side), long enough to fit over the housing of the built-in flash (not the flash itself but its cover). Cut through both sides of the case, and secure the edges of the cut with some Gaffer tape to make sure it does not rip. Test that the slit fits over the flash cover.
- Insert the SoftScreen's white screen portion into the case, so that the case flap drops over the black back of the screen, facing the photographer-side of the camera. Align the hole in the screen with the slit in the case.
- Put the Fuji Filter in the case with the SoftScreen.
- Mount the half-encased SoftScreen on your on-board flash.
- Test that the pre-flashes are cut down, but that remote Speedlights still get fired.
- Try also just propping the filter behind the SoftScreen, without the case. I am not sure which is better and YMMV.
At any rate, I hope you Enjoy it!
Aperture 2.1.2 Update - No Nikon D90 RAW Support
 Apple updated Aperture to 2.1.2 today, but alas, no support yet for RAW files from the Nikon D90. RAW files are a capture of the data right off the camera's sensor, and are so-named because the files are not yet processed into something that can be viewed or printed. RAW files are usually something only pro photographers or at least "prosumers" are concerned with and are only output by DSLR-type cameras, but recently even high-end compacts like the Nikon CoolPix P6000 or the Canon G10 support RAW.
Camera makers include proprietary software with their cameras that can read their own RAW file format and display or edit it, but the included software is often less-than-stellar in quality. And despite the drawbacks like the proprietary nature of each RAW format (Nikon's NEF, for example), and the large file size (usually twice the size of a high-quality JPEG file) you want to use RAW when you want the highest level of control in post-processing the photograph, since so much detail is available in the RAW file in the first place. So, people turn to software programs like Apple Aperture, Bibble Pro and Adobe Lightroom. It must be a huge challenge for Software Makers to keep up with RAW formats. Here's hoping that Apple puts Nikon D90 Support in version 2.1.3.
Update - after further research and to be accurate, Apple updates its RAW support with "Digital Camera Raw Compatibility Update" software updates such as this one, which either come as standalone updates or as part of an OS X update. See "Digital Camera RAW Formats Supported" and Aperture's RAW Support Page. So, this is not an Aperture issue per se, as Apple has built RAW support into the Digital RAW Compatibility module. Maybe the fact that Adobe Lightroom has been updated to support the D90 will help motivate Apple.Sunday, October 19, 2008
No Bikes Allowed on the Bridge to Hakkeijima

I tried the hilly, hilly East route again this weekend, and made it all the way to Hakkeijima Sea Paradise, which is an awesome place to take the family. The trip was about 45 km, and I dragged the Nikon D90 in my quite-rugged Speed Freak waist pack from Think Tank Photo, and took a few shots of the bridges in that area with a wide angle lens.
When I tried to cross the main bridge to Hakkeijima Sea Paradise, thinking I'd get some lunch there, I was greeted with a blasted announcement aimed right at me. "No Bicycles Allowed in Hakkeijima Sea Paradise. Please use the bicycle parking lot behind you on the left." Actually it was more like "NO BICYCLES ALLOWED!" And of course it was in Japanese. I was so surprised by the volume I nearly fell off! (It was definitely cranked to 11) So much for lunch at Hakkeijima. I got a lot of evil stares (like Ultraman), and then some laughs because I understood the warning fully, and that it was aimed at this helmet-wearing, waist-pack toting white-boy gaijin, but at least I did not get fined 98.00 bucks for my 6 feet.
Friday, October 17, 2008
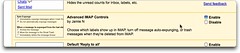
Enabling Labs Tab in Gmail
If you would like to use some of the Google Labs features in Gmail but cannot find the Labs tab, you can enable it by visiting the following URL after you log in:
https://mail.google.com/mail/?labs=1#settings/labs
Now you can just click the Labs tab and start selecting the Labs features you want, like "Advanced IMAP Controls" to avoid downloading the entire All Mail folder. Gmail will remember you want the Labs tab for next time.
Sunday, October 12, 2008
New Hilly Japan Bike Route from Gumisawa to Hakkeijima
Saturday 11 Oct I rode a new 40 km route, this time going East from the mother ship towards Hakkeijima. I went up kanjo 3 go, towards my elder daughter's school, and over to CostCo for some bagels and granola, but it was much harder than I thought, with a 4 km hill right out of the gate. A good difference from the usual "almost no hills" route. Hill-riding is really a different skillset, and is tiring in a different way from my 63 km route down to Enoshima, along the coast, and up via the Sagami and Mekujiri rivers.
Check out my other bike routes in Japan, as there are some really nice places to ride here in Kanagawa and Shonan.
Save Local Disk with Gmail "Advanced IMAP Controls"
 I outlined "Setting up Leopard Mail.app with Google Gmail IMAP" previously, and Google Labs has released a new feature for regular and Google Applications Premier Edition Gmail - Advanced IMAP Controls. This tip shows you how to avoid having to sync the GMail "All Mail" folder, thus saving a considerable amount of local hard disk space in many cases. Before enabling Google Labs features, note the caveat mentioned by Google on this FAQ.
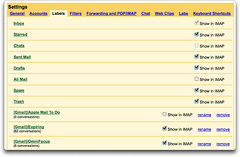 At any rate, here's how to enable Advanced IMAP Controls:
- Close Mail.app.
- In Gmail settings, Labs tab, turn on "Advanced IMAP Controls" by enabling it.
- Delete the locally sync'ed All Mail Folder.
- Start Mail.app and confirm. You can press Cmd-0 to check activity in Mail.app.
You can easily delete your local copy of the All Mail folder from Terminal. Use the sudo command to run a bash shell within your shell, and feed the password prompt your administrator password. You can check the size of the various folders using du, and rm -rf to force-delete the folder. Exit will get you out of the sudo'ed bash prompt and back to your normal prompt.
jrc $ cd ~/Library/Mail/IMAP-rick.cogley\@imap.gmail.com/[Gmail]
jrc $ sudo bash
Password: *********
bash-3.2 # ls
All Mail.imapmbox Drafts.imapmbox Reference.imapmbox Starred.imapmbox
Expiring.imapmbox	Sent Mail.imapmbox	Trash.imapmbox OmniFocus.imapmbox Spam.imapmbox
bash-3.2 # du -h -d 1
bash-3.2 # rm -rf All \Mail.imapmbox/
bash-3.2 # exit
jrc $
When you restart Mail.app, the folders for which you had sync enabled which are now disabled, will take a moment to disappear. I saved myself 2 GB of disk space by enabling this.
Friday, October 10, 2008
Auto-update Presence Info and Twitter
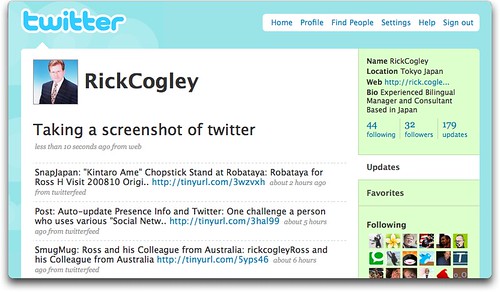
One challenge a person who uses various "Social Networking" web-based applications to network and share information faces, is how to keep them updated. Often, they have application programming interfaces or API's, that a programmer can use to automate various aspects of the system.
A good example of API use is Google's "Statz" application. Statz allows you to update the status or presence information of various applications such as Adium, Colloquy, Conversation, iChat, ircle, Skype, Snak, Tumblr or Twitter. When you change your status in Statz, from "On the Road" to "In a Meeting" and so on, it updates the status of all the applications you have added to the list of apps Statz is meant to update.
Now let's drill down into one of the apps that can be updated via Statz, called Twitter. Twitter is a popular "micro blog" system, in which the concept is you enter what you're doing now, a "tweet", which gets fed into the twitter "stream" along with probably millions of other tweets. Twitter is not a chat system per se, but has that nuance. Statz lets you put "In a Meeting" or "On The Road" or "Away" in Twitter, but another type of "what are you doing" information that might be good for Twitter is when you blogged something or uploaded a photo.
Enter Twitterfeed. Twitterfeed monitors your Really Simple Syndication or "RSS" feeds after you enter them into your Twitterfeed account. RSS feeds are lightweight text files that automatically show site content updates and are output by many types of websites including blog, photo sharing, and forum systems. Here's how it would work:
- Create a Twitter account, supplying your email address and then setting up Twitter as you like.
- Sign up for Twitterfeed, using an OpenID. I used my Google Blogger ID, but many others are available to choose from.
- Now you can enter RSS Feeds into Twitterfeed. For example, Blogger, Flickr and Smugmug all have RSS Feeds that you can use. When you enter an RSS feed, you tell Twitterfeed how often to check it, and what prefix text it should append when it feeds your Twitter.
When it is set up, Twitterfeed will check your designated feeds, extract the latest feed update and appropriate URL, and post these to your Twitter stream with the text prefix. As a bonus, it uses TinyURL to help you keep under Twitter's Tweet length limit of 145 characters. TinyURL shortens any URL into an URL like http://tinyurl.com/3wxjb4.
The resulting Tweet looks something like this:
Post: Finding Photos within a Date Range in Aperture: A friend using Apple's powerful Aperture ph.. http://tinyurl.com/3rsbkc
Enjoy!


Thursday, October 09, 2008
Crumpler "Sinking Barge" SLR Camera and 15" Laptop Bag
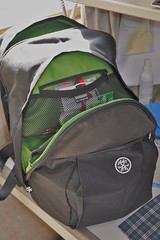
To protect the Nikon D90 and allow me to maintain my sanity while commuting with my computer equipment as well, I bought a black and grey Crumpler Sinking Barge bag, which holds a 15" laptop like a Macbook Pro (not the 17" version, though), an SLR and medium-sized lens, one extra lens, and has enough room for a flash, cables and so on. Today I am carrying all that plus a change of clothes.
Crumpler has a zany flash-based website that you just have to experience. It is like a big vending machine, complete with some funny off-color product demonstration vids featuring employees. Good stuff.
What I like about it is that it looks smooth, not like your typical camera bag, has excellent zippers and workmanship, and protects my usual equipment quite well. If I have any criticism, it is that some of the pockets are a little tight to insert a hand, there is no place for a monopod to be clipped (you need to get the bigger Crumpler models for that), and the inside flap is overly long. Overall, it's perfect for my needs.


Finding Photos within a Date Range in Aperture
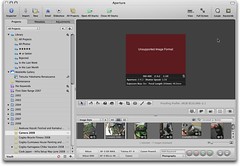
 A friend using Apple's powerful Aperture photo management application asked me how to sort photos into date ranges, such as an entire year, a calendar month, or by day. Here's how to do it with Aperture's Smart Album feature.
 First, create the Smart Album by ctrl-clicking on the Library folder and choosing "New Smart" then "Album". The same thing is available from the File menu.
A grey-black semi-transparent Heads-Up Display or "HUD" will appear, and from the HUD's plus drop down in its upper right corner, select "date". A Date line is added to the HUD, and you can choose "Image Date" "Is In The Range" and enter your date range in the boxes. Note also the "Calendar" selector, which seems only to do a single day.
Notice a couple more things about the HUD. Each criteria line has a checkbox which serves to enable or disable the criteria. There is a "Include if" line with a dropdown, from which you can choose "Any" or "All" from, and whether to check for matches or no matches. This covers the selection logic, and acts upon all the selected criteria below. You can also choose just to filter if the photo was a stack pick, using the checkbox for that in the lower left of the HUD.
When you are done entering criteria, click the X in the HUD's upper left corner to close it. You can reopen the HUD by clicking on the little magnifying glass to the right of the Smart Album itself, to reopen the HUD. I'm using Aperture 2.1.1 at the time of this writing so your mileage may vary.
Wednesday, October 08, 2008
New Nikon D90
I got a Nikon D90 and it's a wonderful DSLR. Hope to be able to write some FAQs or Tutorials about it here.
Tuesday, October 07, 2008
Mac Keyboard Shortcuts Updated
See the updates in Mac Keyboard shortcuts. I added some more beef on the explanations for startup commands especially.
Tuesday, September 30, 2008
Mail.app - Downloading Attachments or Not
If you set up Mail.app in OS X to download attachments for an IMAP account, and then later decide you do not want to store a copy of each attachment locally, you can change the account settings so that only the headers are downloaded. You can make the setting in Mail.app Preferences, but, it takes a while to synchronize. Sometimes a good looong while. Assuming OS X 10.5.5 and that all your mail is up on the server, you can expedite by setting "Keep copies of messages for offline viewing" to "All Messages, but omit attachments" in Preferences, Accounts, Advanced.
Shut down Mail.app, to get it to release the folder we'll now work on. Bring up a Terminal, and switch to your IMAP folder and delete the contents (again, this assumes you have the mail up on the server already):
cd ~/Library/Mail/
cd IMAP-myaccount@mailhost.mydomain.com
rm -rf INBOX.imapmbox
rm -rf etc
Use the rm command to delete the contents. You may have to check what is in there using the ls command first. Next time you restart Mail.app, it will rebuild the folders under your IMAP folder. You can check the size before and after by running the du command:
du -h -d 1Enjoy!
Tuesday, September 23, 2008
Rick Cogley's Mac Keyboard Shortcuts
Check out my new list of Mac Keyboard Shortcuts, especially tasty for beginning Mac users.
Thursday, September 18, 2008
OS X Leopard Upgrade to 10.5.5
I upgraded my system to OS X Leopard 10.5.5 via Software Update (not the combo updater), and there seem to be no overt problems with the upgrade. This was a double-reboot upgrade, and it took some time to restart afterward probably due to whatever cleanup was being done. I noticed that the upper OS X menu bar was displaying incorrectly, in that the "bar" part of it was not visible - I could see only icons. After a while the problem resolved and the menu bar displayed normally. I am on a MacBook Pro with 2 GB memory, so there should not have been memory problems but you never know. After logging in, the Mail and iCal apps took a while to start with the status message "upgrading database". It is best to log in, start your regular apps and just leave for an hour. After two day's use, there seem to be no problems.
Friday, September 12, 2008
Nikon COOLPIX P6000 Released in Japan - 11 Sept 2008
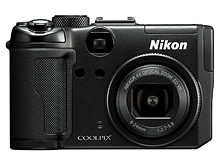 The Nikon point-and-shoot COOLPIX P6000 was released in Japan today and I checked it out at the Shinjuku Yodobashi Camera. Good solid feel to the camera's construction despite a light weight, but it's the features that are a draw: built-in GPS for Geotagging, and the ability to shoot in RAW are my favorites.
 I'll have to find some samples of its RAW output and download them, to see if I can process the files in Aperture. There are a lot of disclaimers about the NRW format RAW files: Windows-only this, in-camera-only that, so we shall see.
I bet we'll see this kind of in-camera GPS become more and more prevelant.
Monday, September 08, 2008
JVC Victor Wooden In-Ear Headphones - HP-FX500
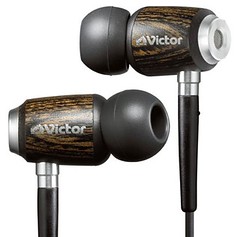 When my iPod's basic headphones died, I bought the wooden JVC Victor HP-FX500 model earphones for about JPY 15,000. These have a wooden trembler, and so the sound is very natural. If you like to listen to anything acoustic, jazz, classical, opera and so forth, these are great 'phones. They have 100dB/1mW sensitivity and 8Hz to 25kHz frequency response. If you have never used an in-ear 'phone before, they take a bit of getting used to, as they shut out pretty much all sound. It's a little disconcerting to be able to hear your own heartbeat, but they sound wonderful.
Saturday, September 06, 2008
Schwalbe Marathon Trip Report
Today I did this route, which has about 10 km of gravel and trail, 13 km of sandy asphalt, and the remaining 40 km regular paved roads or bike roads. I was very pleased with the Schwalbe Marathons I got last week. They have a good feeling, roll very well, and seem to be tough enough to go over patches of asphalt with glass shards without incident. Kudos to Schwalbe for making such a tough tire!
Tuesday, September 02, 2008
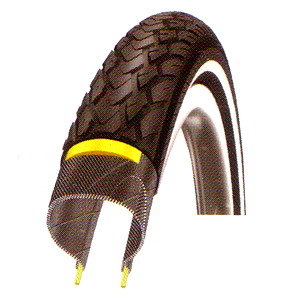
New Schwalbe Marathon Tires
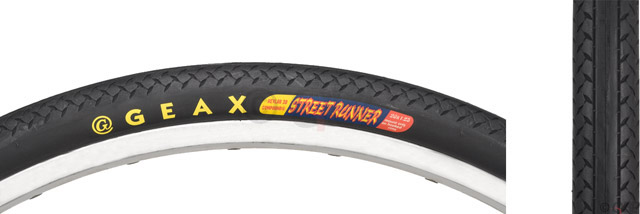
My original Geax StreetRunner slick tires were getting cracked after about 1500 km of use, so I took the opportunity to put Schwalbe Marathon tires on the bike. Very good tires that are still fast despite being "treadier" than the Geaxes. I bet they will last longer, too, if reputation is any indication. Schwalbe Marathons have kevlar inside, and have a protective strip and their Marathon Plus line is even heavier duty. I like the Marathons so far; they feel quite grippy in the corners.

Monday, September 01, 2008
First 70 km Bike Trip
I did the River-Sea-River route Saturday in the rain, my first bike trip to exceed 70 km with a brisk personal best time of 34 minutes from Totsuka to Enoshima. The actual route is less than 70 km, but thanks to getting a bit lost around the Atsugi base, the whole trip was 70.5 km. Not bad for starting last November, but I'm still in no semblance of good shape. Another first was that I took the bike apart to clean it using an organic "orange" de-greaser, and changed the pulley wheels from the Shimano Deore XT plastic ones (seems like a hard vinyl-like substance) to aluminum ones. The metal ones are a bit noisier but it was an interesting exercise to swap them out and see how the thing fits together.
Subscribe to:
Posts (Atom)